It always feels great when you have your mind set on how you want something to look and then it all comes together. This is exactly what has happened with my entry way/porch area. I knew I wanted to put stripes on the wall but it was a matter of finally getting around to it. Once that was done and the porch was all cleared out I knew I had to make it something that was worth having. That’s when I ordered my desk and watched the space slowly turn into what I had envisioned. I had my cream and tan stripes, I had my white lacquered desk, now it was time for some color. With all those windows in that space it was the perfect opportunity to add a fun hue! For the most part, I love calming colors in my space like soft muted blues, greens and gray and dare I say beige! Well, not this time! I was looking for a straight up girly space and what is more glamorous and girly than PINK! I decided to use my existing blinds to create some roman shades with some awesome pink fabric! I had to first find the right fabric and I forced myself not to over think it because oh lord I could spend months trying to pick the right fabric. Just ask the pillows on my couch that I have been trying to replace forever now! Here were some of the options I gave myself.
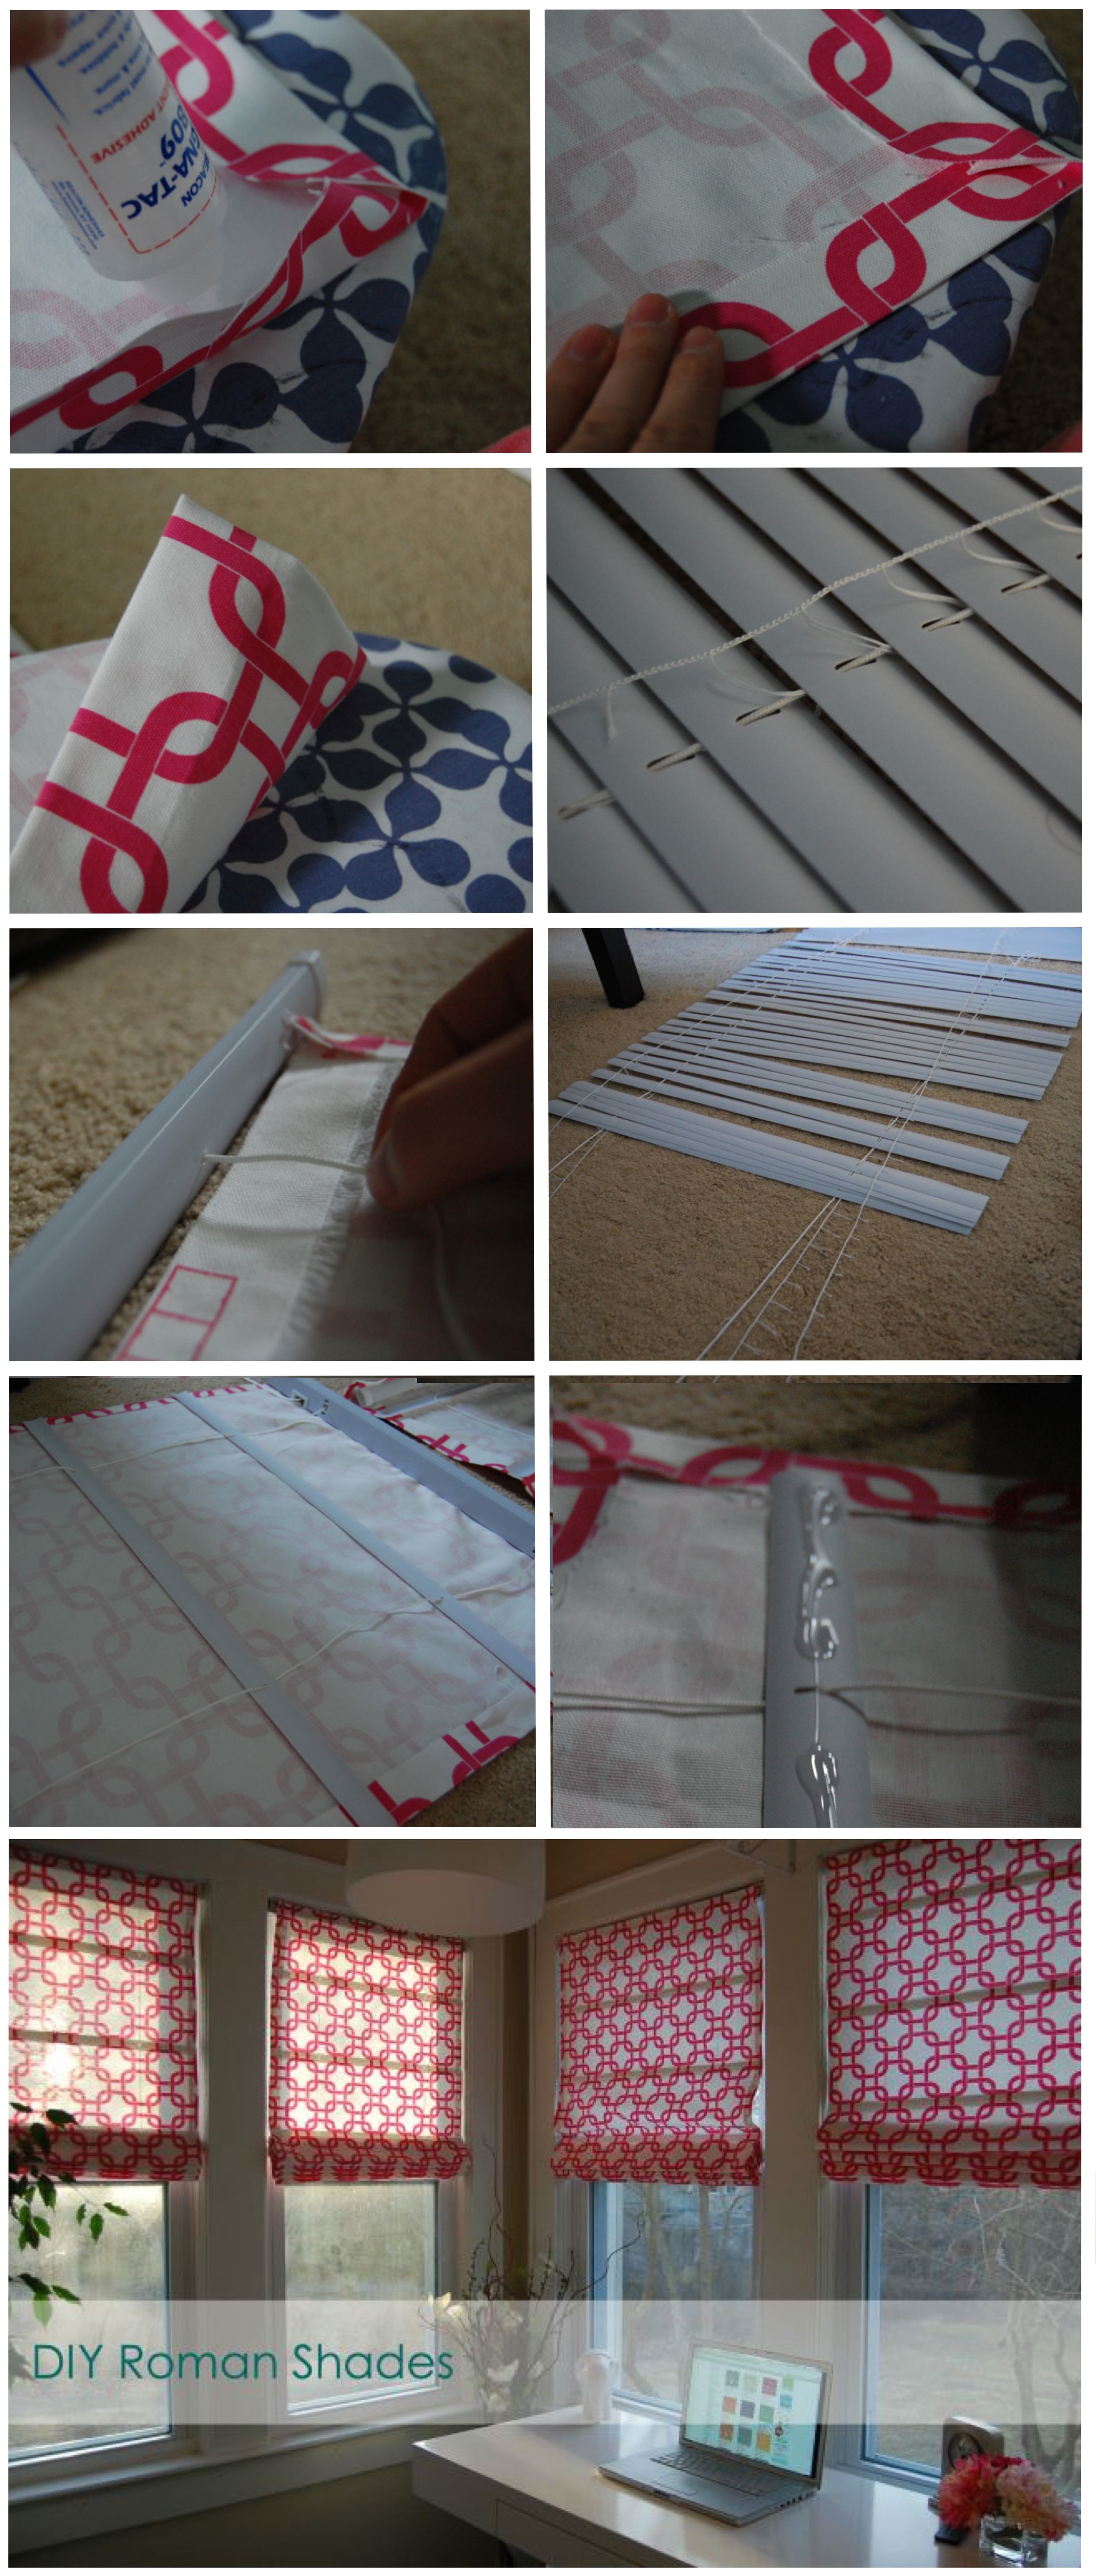
I knew I wanted a geometric pattern so that almost immediately eliminated the second fabric (Waverly Chippendale) and I wasn’t too sure about that first print because of the whole papaya part. Didn’t sound so pink to me. So that left me with the cross section print and the third link print. I’ve seen the cross section print used many times for curtains and upholstered pieces and while it is nice, the cross section print is a little too small for me. That left me with the link print and how can you say no to a print that is called Gotcha White/Candy Pink! Did I forget to mention that it was only $7.48/yd. As the Kardashians say “oh yeah, oh yeah, oh yeah!” I measured out my blinds, 2 @ 22 1/2″x 52″ and 2 @ 26 1/2″ x 52″ and ordered 4 yards. Once it arrived it was time to get started on making the blinds. Only 5 materials are needed for this project:
Fabric, Measuring Tape, Scissors, Fabric Glue, Mini Blinds.
1. Cut your fabric 2″ longer than your blinds, width and length. Since one of my blinds was 22 1/2″x 52″ I cut my fabric to 24 1/2″ x 54″. The reason for this is so you can fold all the edges over. You may want to iron a crease on the edges to make it easier.
2. Use fabric glue to create your hems all around. You can also sew this if you want a more tailored look. You may also use Heat and Bond but trust me it’s more work and you can’t tell the difference between that and fabric glue.
Should look like this when it’s all done. If it does than you’re ready to prepare your blinds!
3. Open your blinds fully and cut the ladder part that holds all the blind slats in place. DO NOT cut the cord that runs straight through each slat.
4. Pop the button on the bottom that holds the thick cord that runs through the blinds and pull that cord out.
5. Remove all the slats and the cut-up ladder pieces to reveal nothing but the top bar and the thick cord.
6. Lay your fabric down (print side down) and place the skeleton of the blind on top. Measure where you want your folds to be when you hang your blinds. I believe I did every 8″. Make sure you run that cord through the hols in the slats.
7. Using your fabric glue, glue down the slats the to fabric, curve side down. After applying the glue I brushed it down so that it would dry nice and smooth. DO NOT glue the cord to the fabric you need that to be able to move.
8. After all the slats (along with top bar and bottom piece) are glued down take the end of the cord and put it back into that bottom hole, tie a little knot and pop the button back on.
9. Hang your gorgeous custom-made Roman Shades!
LOVE LOVE LOVE!
I know it seemed like a lot of steps but trust me it is so simple and quick! Just need to hang some frames, find a table lamp and a chair and I am all set!
I love these! I can’t wait to make these for my house.
What a great idea! I love the fabric you chose. They look awesome!
Yours came out lovely too!
These look so professional. Well done!
Thanks so much!
Just thought I would let you know that I pinned this & it straight away got repinned about 60 times. So many people love what you did!!
I totally saw that!! Thanks so much!
I was dissecting the visuals you have for this tutorial and they were all very self-explanatory! However, I couldn’t see what you ended up doing for the too of the blinds…wrap the fabric around ?!? Thanks for your help!!!!!
Hi Kellie! I’d love to help out but I’m not quite sure what the question is. Maybe a word didn’t come through in the question? Was it the top and bottom part of the blind that you were wondering about?
So fun and gorgeous!! I love this project, and they look amazing in your room! Thanks for sharing and linking up!
Awesome project! I’ve been wanting to do this and just have to find the perfect fabric. We have tons of blinds that need some freshening up!
Thanks! Isn’t it amazing how long it takes to choose a fabric! The problem is too many choices if someone narrowed it down to 10 patterns I’d have so many projects done lol
I love this! they look awesome! Question: could you do this with lining the panel? I need something that is a little more light blocking – I guess you would just sew the liner to the panel before attaching everything?
Great job!!!
Thank you! You can absolutely use a blackout liner. You can just sew it to your existing fabric or what I might do is after finishing the shades add it to the back by using the fabric glue. This way when you look at the window from outside you wont see those pesky blinds!
Love the pattern. They look great in your room.
Genius! I’ll have to try to buy my mini-blinds back from the thrift store now. Doh! I never need things till I give them away!!
I love the pattern and color choice! Very nice.
I LOVE these!! I’m intending to do the same thing in our master bathroom, where some of the shades have gotten wonky. Great job, and thanks for linking up with the Winter Pinterest Challenge!
Erin
P.S. I love the fabric you chose!
Absolutely lovely. I’m finishing up a pair for the bedroom now, and will be posting the details on Monday. I’d love to link to your post as my source of inspiration! Very well done! xoxo
Thanks you so much and thanks for the link credit. Can’t wait to see how they turned out!!
LOVE this idea! I have been trying to find an easy way to make Roman shades – especially since all my windows would be custom sizes. Great tip!
Love this!! Definitely something I need to do. I have been wanting to have Roman shades for a while but the pre-made ones seem so boring. The fabrics just aren’t right. Can’t wait to try this!
This is really a great idea, I love the variety, one can have. Is there another way, though to do it, if you don’t originally have old venetian blinds up? Another, way to improvise? Your thoughts, are appreciated. Thanks, love your creativity….God bless you. Elena
gorgueous! can u pls let us know where did u buy the fabric? thanks
Thanks! I buy all my fabric at fabric.com…it’s the cheapest place I have found so far!!
so very smart – i’m only sorry i didn’t find this BEFORE i made roman shades for my son. awesome – truly awesome.
Thanks!! But hey at least now you have an excuse to do it in another room!
I love what you did !! It looks amazing! I can’t wait to give it a shot
Once again, beautiful work!
Question for ya! Do you know how to make the relaxed roman shade?
I think if I were to do relaxed I would still use the mini blind just so that I could hang it but you wouldn’t need the slats. Just roll the bottom up to where you would like it and then sew it on the sides or use hem tape if you don’t sew! I hope that’s helpful. If I come across a good tutorial I will send it your way!
I’ll have to give it a shot
thanks 
We currently have wood blinds, could I use those instead of mini blinds?
Absolutely!
Beautiful job! I love the fabric you chose. This is something I’ve always wanted to do. You make it look so easy. Thank you for sharing in the DIY Project Parade!
I swear, it is so easy!!
Have you ever had any issue with seeing the fabric glue through the curtain material? I’m doing these in burlap.
No I haven’t but only because when I applied the glue I used a foam brush to spread it out. Burlap may or may not be different because there is more of a chance of it getting through the fabric. You should try a small piece on something to test it out. Let me know how it goes!
Great job – curious, how well do they move up and down?
Thanks! They move great up and down…no different than when they were just the blinds. Sometime I have to help the folds when I pull them up but it’s no biggie at all.
has anyone ever seen roman shades that pull up? They would be attached at the window sill and when pulled they would pull up so the shade could be pulled to not see out of the bottom but out of the top in the space of the upper part of the window.
Hmm, I haven’t seen ones that work the opposite way but let me know if you come across any!
These are SO great! I think I could do it, even though I’m not terribly handy. QUESTION for ya though: how far up do they go? Can they gather all the way up to where the first slat is located (about 6″ from the top)? I’m interested in making blinds that can be mostly rolled up to let in the nice daylight.
Thanks! And nice work, again.
Thanks so much Lauren! They definitely pull up all the way. If you make the slats 6″ like I did than I would say when you pull them all the way up there will be a few inches of the other folded slates under the top one. If you wanted it to be less then I would recommend making your slates less wide, maybe 4 inches? Hope that’s helpful, let me know how it turns out!
Going to try this today. Can you use hot glue?
You might be able to but my worry would be that the heat might melt the plastic slat. Let me know how it goes!
I have a ton of fabric waiting for me to make into Roman shades….maybe I’ll try gluing them instead of sewing. It seems like it’d be much faster!
Love it!! Looks so easy to make, I need some new window treatments! Glad I found you on ‘stumble upon’! I’m a new Facebook fan!
Barbara at Chase the Star
chasethestar dot net
Yay!! Super easy…and welcome, so happy you’re here!!
If I were you, I would use Pellon Wonderunder to iron the blackout liner fabric to the back of your chosen pretty fabric before you start the rest of the project. Then proceed as directed and it will look very professional and no sewing needed!
This seems like a stupid question but I’m confounded at the moment. I finished making my first DIY Roman Shade. Before mounting it to the window, I tested out the shade and it’s not folding up correctly. It’s bunching at the top first instead of from the bottom up. Obviously I’ve done something wrong but not sure what….Could it be b/c I didn’t tie the cords evenly? Any ideas?
You’ve got me stumped! I just took a look at mine to see how they might bunch at the top first and I’m at a loss. You kept the cord correct…made sure it tied back into the bottom piece of the old blinds? Maybe once you hang it you won’t have that problem? It’s kind of hard to pull up the shades if they aren’t mounted to something. I would also check to make sure the cord was even on both sides or else the blinds will be lopsided. I hope this was helpful!!
Going to give this a try in my master bath on small window wish me luck yours look amazing
Good luck!!! A bathroom window is a perfect place to start!
When I made the roman blinds, and installed them, they bunch up at the top, where the top bar is. What are the instructions for attaching the material to the top bar?
Hi Amanda,
I simply just used the fabric glue the same way I did on the slats on the top. Since the back of the top bar just slide into the brackets it didn’t cause a problem. Not sure why they would bunch unless the way yours install is different. I hope that was helpful!
I think I know what Amanda is asking as I have the same question. If I glue the fabric all the way across the top bar then hang it in the bracket supplied by the blind mfg., there is a piece that slides in across the front of the bracket (the piece keeps the blind in the bracket) which causes the fabric to get caught and bunch. Is there an alternative method of mounting these? I can’t wait to try these…what a super idea!
I just left those pieces out because where my blinds are rarely put them down but when I have I’ve never had a problem with the blinds coming off. When you pull on the string just be gentle and you should be fine!
Ditto the genius! Those mini slat blinds can come in handy!
So excited to try this out!!! in our Familyroom we have 3 windows next to each other and i wanted to do Roman Shades but with some sort of blackout material to help keep out the extra sun on the hot sunny days to keep the room cooler.
Since the windows already have the mini blinds on them – a crappy aluminum kind. Hoping they will work to attach the new roman shades to. My kids have managed to bend several of the slates so i can just use a few of the good ones. 
Awesome!! The aluminum should work too!
Hi Cindy! I can’t wait to make these for my new home!! What do you exactly mean by,” Brush” the slats after glueing them….so they will dry flat? What do you brush it with? Do you brush only the curved slats? Thanks!!
Hi Elizabeth! So what I mean by brush the glue is just to spread it across the curved slat, this way you dont have a thick line of glue and your able to cover more surface of the slat. I just used a black foam brush but you could even use your fingers to spread it! Hope this is helpful!
Hi, did you have to cut a hole in the fabric someone to put the cord that pulls the blinds up and down through? Does this make sense? Or do you just lift the blind away from the window and pull the cord that way?
I actually just pull the cord on the side the way you normally would and then I hide it behind the shade and usually let it sit on the ledge where the lock for the window is…I hope that made sense!!
Hi I know this is an old post but I’m curious about a couple things. I just made these and love them but I’m having trouble with the chord getting stuck on the slats when I pull it up or down. Also I used the cheap vinyl blinds and my fabric glue isn’t sticking well. Any suggestions? Do yous still work years later?
Sometimes the line got caught for me too on the sides I just pulled it cautiously. As far as the glue it has totally held up even with all the sunlight (and heat) that hits those windows! I don’t live there anymore but my friend moved in and kept the blinds and still says how much she loves them! Maybe try using a stronger glue?
Awesome thanks for replying. A different fabric glue did the trick. I’ll pull more cautiously hopefully that will do it.
Love theses, esp. your fabric choices. Where do you buy your fabric?
Thanks Nicole! I have only ever purchased my fabric from fabric.com…they have a huge selection and fantastic affordable prices!
If I use a liner, do I have to glue it to the blind? I was thinking of putting it on after I finish the blind like you suggested to cover the slats. Will it fold like the top fabric? Thanks
The more I think about it I think I would attach the liner to the back of the fabric and then do all the steps…I’m not sure if the fabric would roll up if you glued it to the other side of the slats. It might but I have never tried!
I love them! Absolutely adorable!! But they seem to hard for me to make…I am so not good at following directions!…and I wonder where my kids get it from!!
Peeking in from a thread of yours I saw at the new forums at Younghouselove.com. Fun idea! Pinning to a secret board of mine at Pinterest.
Visiting from NW Illinois,
Suzanne (maytagnmom at the forums)
Thanks for stopping by! Don’t you love those secrets boards!!!
SO beautiful! I can’t wait to do this on our back porch! There is so much sun on our porch in the morning it would be great to filter it a bit. I’ve always had a soft spot for roman shades! Thanks for posting these directions!
I love the roman shades that you made but I was wondering how you hang them when you are finished? When you slide them back into the bracket there is a small piece that you have to insert to keep them in place. Do you cover the pieces with fabric or just let them show?
Hi Patty,
So I actually ran the glue all along the top bar but then stopped right before those two ends. Once you put the blinds back into there slots you can slide that piece in and then the fabric will just cover it even though it’s not glued. Hope that makes sense! I’ll try to add a picture to the post!
Thanks, it so beautiful and love the way you explain it. I always wanted to do this.
Thank you Adele! I’m glad you find it helpful. It’s always a challenge to make something that looks hard but isn’t look simple to do!
xo
Hi!!! Will these blinds open all the way to the top? I am looking for a less expensive option for our guest room and these would fit the bill if they did. They look great!!!
Hi, me again…I saw the comment at the top about them going up to the top….Can’t wait to try it…..
Yes! They roll up to the top but not completely. You’ll have about 5 inches of fabric at the top when you pull them up!
did you cover the top and bottom bar with fabric? How did you do it?
Yes, I just glue the fabric to the top and bottom. I don’t cover the ends of the top bar so that I can slide it back into the brackets! The pictures should show.
I’m so excited to try these! Also your tutorial has been the easiest to follow! I’m wanting to do fabric on the back side as well so that the print can be seen from the outside of the windows…any suggestions on how to do so?
Thanks for the comment!! It has a lot of steps so it makes me happy to hear that it’s easy to follow!
My only suggestions would be to use a light weight fabric since you’ll be doing it front and back and I would probably do the back side first and then the front. You also might want to glue the top of the backside fabric to the front of the top bar and then when you do the front fabric glue the top of it on top of the backside fabric…hope that made sense!! Good luck! I’d love to know how they turned out if you give it a shot!
xo Cindy
Thanks Cindy! yes that majes sense! I’m midway into a whole living room face lift so once I get to the windows (which I hope will be soon!) I will let you know how it turns out
these are beautiful! Thanks for the tutorial
Thank you so much for this tutorial! I totally made my own and they are amazing!! What a great idea! Here are how mine turned out! http://rappsodyinrooms.com/2012/12/17/mini-blind-roman-shades/
Beautiful shades. Any suggestions for making them so the insulate as well as look great?
Thank you Becky! My recommendation would be to maybe use a thicker fabric but the weight might not hold up. Roman shades aren’t usually used for insulate so it might be hard to figure out! I would try a thicker blackout fabric…you could check other comments for some advice I have for applying blackout. Hope this was helpful!
This is really great! I just wonder how will I be able to wash the fabric when it gets dirty?
I vacuum them regularly and if you ever get a stain on them you could always use a spot cleaner on them!
a great idea with these curtains. wonderful effect
Loved the concept and the tutorial was very helpful. I made two shades for my daughter’s bedroom. I needed them to be of the blackout variety and I found that backing them as a last step,as suggested, to be a complete disaster!!!! Wanted to enlighten anyone who might attempt this to ABSOLUTELY glue the backing, measured to the exact dimensions of the blinds, against the back of the facing fabric before gluing the “hem” in place. The slats should then be glued down over the back of all layers. The finished product is amazing; functions well and really blocks out the light. Just be sure and select a backing fabric of a tight weave and dark color…I used black. Thanks for the inspiration!!!
Thanks for the great advice Trish!
Could I ask why it was a disaster? I want to put these in the front room of our house. Because it’s a huge window and you can see them from the street I was going to cover the slats with some sort of fabric so they wouldn’t be quite so ugly to look at ( I was thinking about using some iron-on adhesive to hold the 2 pieces of fabric together with the slats inbetween). Any suggestions are VERY welcome!
Hi Casey! I think Trish is just saying that you have to glue the fabric together after making sure that the measurements line up. I assume she didn’t do that at first and that’s why it was a disaster! Hope that helps and good luck!!
okay, you have convinced me. I was going to use up some flannel/felt? material for my daughter’s curtain but my hubby thinks that material is the perfect blanket. But I didn’t want to just go out and buy new fabric. But….now I will! I will probably line it because the whole reason for me making her curtain is to block out the sun so she sleeps longer (hence my idea of using the thicker fabric). But your blinds are too gorgeous to resist. Can’t wait to try this!!!
I’d love to know how they turn out!
They turned out great!! I used a tightly woven cotton for both layers.. Folds up easily when the shade goes up and really blocks the light.
That’s awesome! Thanks for sharing Trish!
I am wanting to make these but I need the fabric to be on both sides. Is this possible if I glued the second piece of fabric to the flat side of the blind??????
Yes you definitely can! If you read other comments you can see the success that others have had with it!
Loved this idea too! Just wondering how you attached it to the frame of the window?
Thanks Heather! I attach the fabric to the mini blinds so when they go back on the window I just put them on the same way you would the mini blinds…into those little plastic squares! Hope that helps!
Hi! I love your tutorial and pinned it a while ago. Could I use wood blinds instead of the plastic mini blinds that you have? That’s what I have in my house so I was just wondering if it’s possible. Thank you so much for your response and a great tutorial. I’m going to try this out this weekend.
I have never tried it with wooden blinds but I will say the concerns I would have with that would be that the slats would be much heavier which shouldn’t cause too much of an issue but also that the wood is dark so you would need to make sure your fabric is thick enough that you won’t see the wood through it. Also make sure that the glue holds well on the wood. I’d love to know how they turn out!
Thank you for your advice! I’m going to try it out this weekend and send you an update. Happy Holidays!
Great, good luck! And happy holidays to you too!
Wonderful tutorial, and it looks easy enough too. I plan on making two for my kids’ bedroom. Can I do this with cordless mini-blinds? I’ve never really compared the construction of corded vs cordless blinds so I’m not sure how it would affect the outcome. I don’t see the pull cord in your final product but it must be in there somewhere, no?
I’m not really sure how that would work. From my understanding cordless blinds don’t have removable slats but if you have ones that do then it just might work! I’d love to know if it did!
Oh my word!! I got quoted $156 each today for each of my six tiny airstream camper windows for roman shades! Girl, you are saving my wallet! I am doing this!!!!! I cant thank you enough! Now i must go fabric shop online, because i am so excited to start!
Tonya
I would love to do this for my living room.
Hi! This looks like an awesome project and would love to do this for my daughter’s bedroom. Just a question though; how do you clean/wash the fabric?
I made these for my kitchen with blinds I’ve been anxious to replace and it turned out perfect. I read the directions once and had it memorized, so easy to follow your directions. I had a hard time picking fabric as well but figured the blinds are so cheap and get great discounts on fabric that I can make a few and change them out when I feel like it. Thanks for the idea!!!!!
Yay! That makes me so happy!
What did you do with the hook thing that tilts the slats opened and closed. Mine sticks out a bit so I’m worried the shades won’t look flat when they are down. If I glued the fabric on the back of the mini blinds so the hook and string are facing the window glass, would they still work?
I never had a problem with hook sticking out! The blinds stayed completely flushed. I think once you start you can see if it will do the same. If it sticks out a bit you might want to try to snap it off. You could always do it in the other side i dont see why you can’t!
Can you tell me how much fabric is needed? I am trying to figure out how many yards I would need to purchase. I love this idea and can’t wait to make them for my kitchen.
You need to measure your blinds in order to know how many yards you’ll need. If you look back on the post I explain how many yards I purchased based on the size of my blinds. Hope this is helpful!
Hello! Love this idea.
One question after it’s finished are you able to lower and raise the blinds? Or are they that length only?
Thanks! Yes, the blinds still go up and down just like they normally would
I used your tutorial last night to make a shade for the nursery. It turned out great! Thank you for such concise directions!
That’s so great!
I just followed your tutorial and they look AMAZING! They don’t match my kitchen yet, but one step at a time
Yay!! So happy it worked out! I’m sure they look amazing!
These look great! And so easy! My only concern for where I want to use them is how do they look outside the window? I have a sunroom that faces out to a walkway in my backyard and Im not sure how they would look looking in the window…
I would say that’s the only downside…from behind it looks like the back of the fabric and the window slats. You could always attach another piece of fabric on top of the back and use the fabric glue to adhere it or just plain linen fabric
These are so cute! People should be careful putting these in kids’ rooms, though, because of the strangulation danger posed by the cords. Something to think about.
This is just what I wanted to find for my kitchen curtains! Thanks for sharing!
Just a note: This ONLY works well with lighter weight fabrics. If you use something heavy weight you will have to use something to keep the slats rigid or they collapse from the weight of the fabric and won’t go up correctly…..yep – been there and done that – I had to add dowels to the slats. I also had problems getting the glue to stay adhered to the plastic so went with E6000 glue.
Also, once they are reinforced you can add a second fabric to insulate and hide the unfinished back. I actually cut up an old quilted mattress cover to provide insulation (it gets a “tad” cold here!) so there was no cost involved.
Thanks for the advice!!
I thought adding black out material would make it too heavy for the glue. If I glue blackout material to the other side of the blinds, are they really going to be able to pull up properly?
See my note above – I had to use E600 glue and needed dowels to reinforce the slates when I added a backing to my blinds.
First of all, let me say that aI LOVE how these blinds turn out. They’re stylish and take very little skill…just my speed! I’ve made a few of these now and wanted to share a few tips for the successes I’ve had. Don’t get me wrong…not all attempts were successful! But I’ve used these tips now a number of times and they work every time.
1. Instead of using just one slat per fold, I glued 3 slats together (using Gorilla glue for strength) for each of my blinds to make sure there was enough structural integrity. It works really well, and I stopped gluing about an inch either side of the string. I did this because I used an upholstery fabric that was a bit heavier and wanted to make sure the blind didn’t fail or the slats bend.
2. I was able to ‘line’ my blinds with a lighter weight fabric in a contrasting color. This was the final step for me prior to mounting. The only problem was the gluing down of the lining. I found that if I glued it down all around and on the slats, the blind didn’t work properly. I ended up just gluing to the top, bottom and the slats, leaving the sides un-glued. Now my blinds look good even from the outside, up or down.
Amazing! Thanks so much for these tips!!
This is unrelated to this post, which I LOVED, btw, but, where did you get your desk? I’ve been searching for something just like it! Ikea?
Thanks! I bought the desk from World Market and I love it!
The only thing I would change would be the raw edges on the back. Take some twill tape and cover it. Once people found out you made them they will also look on the back and it should look as good as the front.
Hi! Do you have a picture of the back? I want to put these in my front room, but the window faces the street and my front porch…. Worried you will see the seams etc
I don’t have a photo but I will say that you can see the slates. One thing many people have tried is getting basic white fabric and gluing it onto the back so that you don’t see them. If you read some of the comments there have been a few recommendations on how to do it!
BRILLIANT JUST BRILLIANT LOL, I have been looking for a way to fix my shades in my camper without spending a arm and leg to do it,So glad you posted this, I will try and send pics when I get them done, Thanks for the inspiration, I am so excited lol
So happy you found the post!!
I was so excited to try this on many of my windows and when I found the perfect material off I went. I made 7 of them in just a couple days and what a beautiful difference it made in our home. Thank you for sharing such a cleaver idea. I would share pics but not sure how.
That’s so awesome! If you’re on FB you could send them that way to Made2Style, I would love to see them!!
Could you put something on the back side to block more light out? If so, what would be something to use? Thanks!
You can add blackout fabric to the back. I haven’t tried it but it is possible!
I totally made these the other day because my boys kept destroying the blinds in their room. They look amazing and the boys love them. Thanks for the idea!
I would like to put these in our summer place, but wonder if the desert heat would eventually melt the fabric glue as the blinds would hang in sunny Windows?
Would the room itself be that hot? I think it should be fine. I had a lot of sunlight come through (not desert like) and I never had a problem.
Does the string that pulls the blinds turn into one string with cutting the other strings out? On my blinds now the pull up the blinds string is single until I pull the blinds up. Than the string gets longer exposing 3 strings tied together. So if I pull my blinds up there is a risk for a child to get choked on the strings that are tied together. I want to eliminate those 3 strings for risk of choking hazard.
I’m not sure since they blinds you’re talking about are different then the ones I used.
Just now discovered your Roman blind post and it is genius in its simplicity. I’ve made Romans the tedious way with all the rigging and sure wish I had known this before I did them. !!! Loved your geometric fabric….seems every color paired with white looks nice and crisp. Thanks for sharing your ideas.
Thank you Ruth! I’m glad you found it!
I love these, what do they look like from the outside of the windows? Could you do a fabric on the back side too?
You can certainly do that…the back side just shows the slats on the fabric. It doesn’t look terrible but placing fabric on top would help I would just be sure to buy a lightweight fabric so it doesn’t weigh the curtain down.
Beautiful! Could you see the pattern from the outside? I’m about to make some and I’m curious whether I need to use a white liner on the back. Thanks
The back of the fabric is white so that’s what you see in the background. Depending on how thick your fabric is you may need to add a liner if you don’t want the pattern to peek through the back