Well that’s a mouthful! So the time has come, it’s Pinterest Challenge time again! Every season Sherry from YHL and Katie from Bower Power throw a little link party to get people to stop pinning things and actually start making. This couldn’t have come at a better time because I have wanted to start this project forever and once Miss Kelly made her way into my kitchen I knew it was time to start it.
This was the image I saw that sparked me to start saving my toilet paper rolls. You can find the post here.
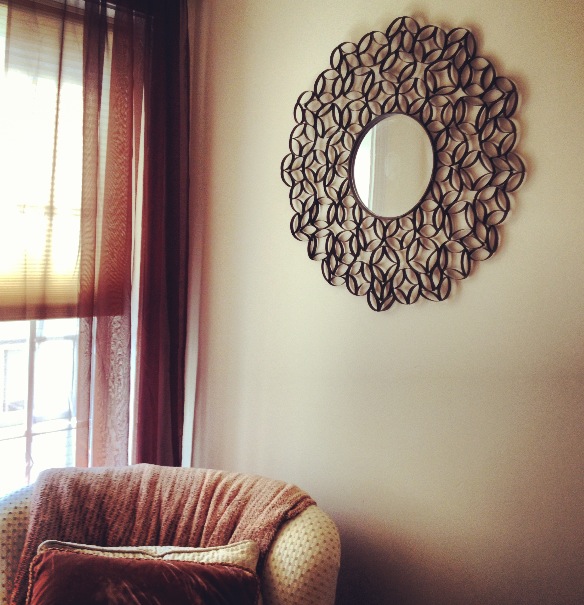
I literally have been saving my rolls for. ever. I’ve been holding on to them wanting to create some type of focal wall art and it was finally time to get er done! I wanted to add a mirror to the piece because the kitchen only has a small window and doesn’t get a lot of light so anything that can reflect light I’m all for.
Here’s what my toilet paper wall art turned into!
Ok let’s get down to the nitty gritty. Here’s exactly how I made this beauty happen.
The first thing I did was flatten my rolls and make 1/2″ marks.
Next, I cut them up. I also used paper towel rolls. I didn’t actually count
how many I used but I’m gonna take a guess that I used about 20 TP rolls and 6 PT rolls.
Then, I took 4 pieces and glued them together using a hot glue gun.
I continued doing this until I had about 40.
Then I took the mirror I was going to use (10″ mirror purchased at Joann’s for $8) and placed it on the floor and started adding all the circles around keeping in mind that I wanted to keep it in a circle.


At this point when I looked at it I felt it resembled a snowflake so I had to figure out how to completely round it out. I ended up making something that looked like a tulip to fill in the spaces. I glued two pieces together about a third in and then another two pieces right on the edge then attached them to the piece.
At this point I made sure all the pieces were glued together using a drop of hot glue between pieces.
Cue great tip: Once it was all glued I blasted my hair dryer on it to melt away all those glue gun strings.
The next step was to spray paint it all and attach a 10″ embroidery hoop to the mirror to give it a finished look and to hold the whole thing together. I used ORB (Oil Rubbed Bronze).
Once everything was attached I used command strips on the back of the mirror and hung it up!
Thanks to the Pinterest Challenge for lighting a fire under my ass!
Check back tomorrow or like Made2Style on Facebook to see how I made those drum lamp shades with just a few materials!
Linking Up To:


Nothing like the Pinterest Challenge to get you motivated.
Looks great!
Hi Cindy,
This is great! I love how the rolls made those little shapes, kind of like a stencil. It came out is such a perfect pattern.
What a fun {and affordable} project!
Beautiful!
This looks really great! I’ve always been hesitant to make any of the tp projects I’ve seen because I worried they would look cheap. But yours looks really, really great! Thank you for the inspiration!!
oh-em-gee!!! are you serious??? this is so cool! wish i knew about the collection of tp rolls…i’ve been saving them for the pre-k teachers!!!! very impressive!!!
That looks Amazing!!
Pingback: DIY Drum Shade «
OMG you are a gem that is brilliant
WHAT!! You’re too kind haha thanks so much, that’s so sweet of you!!
This looks awesome! Nice work!
Pingback: Styling Kelly «
Pingback: Summer Wrap-Up «
Thank you so much for yor tutorial, right now just finished my own mirror, thanks to you… After spray painting it will post it…
That’s so awesome! I can’t wait to see!!
Finally finished the mirror… I pinned it…it looks beautiful
Pingback: Jazzed Up Walls « My Cup of Tea
QUE FABULOSO, ESTAN HERMOSOS.ME PROPONGO HACERLO
Pingback: Friday’s Fresh Five! (10/12/12) « What about this?
Toilet paper rolls looks great!
Who would have thought it’s paper rolls, and it doesn’t look cheap either, great job!
Very creative,looks great.Thanks.
Reblogged this on Little Miss Sustainable and commented:
Want to re-consider my sustainable install.
Pingback: Toilet Paper Roll Mirror Frame
I LOVE this project! I have been saving toilet paper rolls for months waiting for the project DIY, and this mirror may be just that!
This looks so awesome! I HAVE to do this! And I HAVE to join Pinterest (I Stumbled Upon this)!
I HAVE to do this! I Stumbled Upon this, and decided RightHereRightNow that I’mma start savin’ them rolls! And I really need to join Pinterest…
Pingback: Arte con tubos de cartón de papel higiénico - Guía de MANUALIDADES
This is so cool! I’m dying to try it out!
xo Sophia Louise
http://www.trendsandtribulations.com
Thanks! Surprisingly it doesn’t take long to save up on the rolls! HA
These are really beautiful! Inspiring to see something so simple create something so lovely!
Thanks!
I have a question how did u go about sticking the mirror and embrodery hoop together? Almost finished
Ooo how exciting! I hot glued it but you can use gorilla glue too expect that requires clamping and the glue expands which I don’t like but since its so lightweight hot glue worked just fine! Good luck! I’d love to see it!
xo Cindy
Did u glue the embrodery hoop in front of the mirror or behind it ima kinda scared to do this step:( I don’t know how I would glue it since the glue dries so quick lol and where would the master piece be glued on the embrodery hoop? Sorry for sooo many question I’m kinda nervous lol
No worries!! It is def tricky because it just barely fits but I glued it in front of the mirror and before I glued it I laid it exactly how I wanted it then put the glue on just the sides of the hoop, like half moons. Then carefully lay it there may be one side where the hoop is sticking off just a bit but it’s really not noticeable once it’s up! I’m here if you need me!! Lol
wow!!! so pretty . i must try to do this!!
You are so creative!!! I love people like you! Great idea
Thanks so much for reading!!
Pingback: Rama de oglinda din role de hartie Reciclare Creativa
Pingback: Specchiera di Carta | Estroo
Pingback: Toilet Paper Roll Wall Art | DIY Project Network
Pingback: Toilet Paper Roll Mirror Art — Totally Green Crafts
Love your creative work. Just a thought…how about spray painting the base of the lamps and the dresser hardware bronze? So all the metals are the same color. Add a wide band of bronze colored ribbon to the top and bottom of the lamp shades?
Yes, I spend too much time on decorating ideas. Forgive me:-)
Ha!! No worries Linda, I’m the same! I actually ended up buying brand new lamps and changed that whole look of the console!